作者 | 小白
小伙伴们可能会觉得从图像中提取文本是一件很麻烦的事情,尤其是需要提取大量文本时。PyTesseract是一种光学字符识别(OCR),该库提了供文本图像。
PyTesseract确实有一定的效果,用PyTesseract来检测短文本时,结果相当不错。但是,当我们用它来检测表格中的文本时,算法执行失败。
 图1.直接使用PyTesseract检测表中的文本
图1描绘了文本检测结果,绿色框包围了检测到的单词。可以看出算法对于大部分文本都无法检测,尤其是数字。而这些数字却是展示了每日COVID-19病例的相关信息。那么,如何提取这些信息?
简介
在编写算法时,我们通常应该以我们人类理解问题的方式来编写算法。这样,我们可以轻松地将想法转化为算法。
当我们阅读表格时,首先注意到的就是单元格。一个单元格使用边框(线)与另一个单元格分开,边框可以是垂直的也可以是水平的。识别单元格后,我们继续阅读其中的信息。将其转换为算法,您可以将过程分为三个过程,即单元格检测、区域(ROI)选择和文本提取。
在执行每个任务之前,让我们先导入必要内容
import cv2 as cv
import numpy as np
filename = 'filename.png'
img = cv.imread(cv.samples.findFile(filename))
cImage = np.copy(img) #image to draw lines
cv.imshow("image", img) #name the window as "image"
cv.waitKey(0)
cv.destroyWindow("image") #close the window
单元格检测
查找表格中的水平线和垂直线可能是最容易开始的。有多种检测线的方法,这里我们采用OpenCV库中的Hough Line Transform。
在应用霍夫线变换之前,需要进行一些预处理。第一是将存在的RGB图像转换为灰度图像。因为灰度图像对于Canny边缘检测而言非常重要。
gray = cv.cvtColor(img, cv.COLOR_BGR2GRAY)
cv.imshow("gray", gray)
cv.waitKey(0)
cv.destroyWindow("gray")
canny = cv.Canny(gray, 50, 150)
cv.imshow("canny", canny)
cv.waitKey(0)
cv.destroyWindow("canny")
下面的两幅图分别显示了灰度图像和Canny图像。
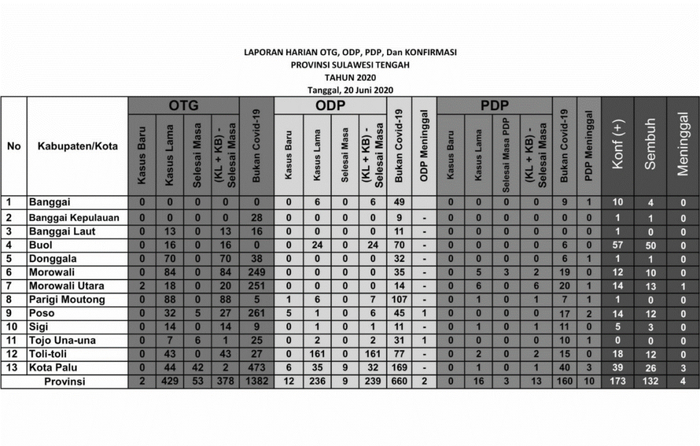
 图2.灰度和Canny图像
霍夫线变换
在OpenCV中,此算法有两种类型,即标准霍夫线变换和概率霍夫线变换。标准变换为我们提供直线方程,因此我们无法得知直线的起点和终点。概率变换将为我们提供线列表,即直线起点与终点的坐标值列表。我们优先选用的是概率变化。

 图3.霍夫线变换结果示例(来源:OpenCV)
对于HoughLinesP函数,有如下几个输入参数:
image -8位单通道二进制源图像。该图像可以通过该功能进行修改。
rho —累加器的距离分辨率,以像素为单位。
theta —弧度的累加器角度分辨率。
threshold-累加器阈值参数。仅返回那些获得足够投票的行
line — 线的输出向量。这里设置为无,该值保存到linesP
minLineLength —最小行长。短于此的线段将被拒绝。
maxLineGap —同一线上的点之间允许链接的最大间隙。
# cv.HoughLinesP(image, rho, theta, threshold[, lines[, minLineLength[, maxLineGap]]]) → lines
rho = 1
theta = np.pi/180
threshold = 50
minLinLength = 350
maxLineGap = 6
linesP = cv.HoughLinesP(canny, rho , theta, threshold, None, minLinLength, maxLineGap)
为了区分水平线和垂直线,我们定义了一个函数并根据该函数的返回值添加列表。
def is_vertical(line):
return line[0]==line[2]
def is_horizontal(line):
return line[1]==line[3]
horizontal_lines = []
vertical_lines = []
if linesP is not None:
for i in range(0, len(linesP)):
l = linesP[i][0]
if (is_vertical(l)):
vertical_lines.append(l)
elif (is_horizontal(l)):
horizontal_lines.append(l)
for i, line in enumerate(horizontal_lines):
cv.line(cImage, (line[0], line[1]), (line[2], line[3]), (0,255,0), 3, cv.LINE_AA)
for i, line in enumerate(vertical_lines):
cv.line(cImage, (line[0], line[1]), (line[2], line[3]), (0,0,255), 3, cv.LINE_AA)
cv.imshow("with_line", cImage)
cv.waitKey(0)
cv.destroyWindow("with_line") #close the window
图4.霍夫线变换结果—没有重叠滤波器
重叠滤波器
检测到的线如上图所示。但是,霍夫线变换结果中有一些重叠的线。较粗的线由多个相同位置,长度不同的线组成。为了消除此重叠线,我们定义了一个重叠过滤器。
最初,基于分类索引对线进行分类,水平线的y₁和垂直线的x₁。如果下一行的间隔小于一定距离,则将其视为与上一行相同的行。
def overlapping_filter(lines, sorting_index):
filtered_lines = []
lines = sorted(lines, key=lambda lines: lines[sorting_index])
separation = 5
for i in range(len(lines)):
l_curr = lines[i]
if(i>0):
l_prev = lines[i-1]
if ( (l_curr[sorting_index] - l_prev[sorting_index]) > separation):
filtered_lines.append(l_curr)
else:
filtered_lines.append(l_curr)
return filtered_lines
实现重叠滤镜并在图像上添加文本,现在代码应如下所示:
horizontal_lines = []
vertical_lines = []
if linesP is not None:
for i in range(0, len(linesP)):
l = linesP[i][0]
if (is_vertical(l)):
vertical_lines.append(l)
elif (is_horizontal(l)):
horizontal_lines.append(l)
horizontal_lines = overlapping_filter(horizontal_lines, 1)
vertical_lines = overlapping_filter(vertical_lines, 0)
for i, line in enumerate(horizontal_lines):
cv.line(cImage, (line[0], line[1]), (line[2], line[3]), (0,255,0), 3, cv.LINE_AA)
cv.putText(cImage, str(i) + "h", (line[0] + 5, line[1]), cv.FONT_HERSHEY_SIMPLEX, 0.5, (0, 0, 0), 1, cv.LINE_AA)
for i, line in enumerate(vertical_lines):
cv.line(cImage, (line[0], line[1]), (line[2], line[3]), (0,0,255), 3, cv.LINE_AA)
cv.putText(cImage, str(i) + "v", (line[0], line[1] + 5), cv.FONT_HERSHEY_SIMPLEX, 0.5, (0, 0, 0), 1, cv.LINE_AA)
cv.imshow("with_line", cImage)
cv.waitKey(0)
cv.destroyWindow("with_line") #close the window
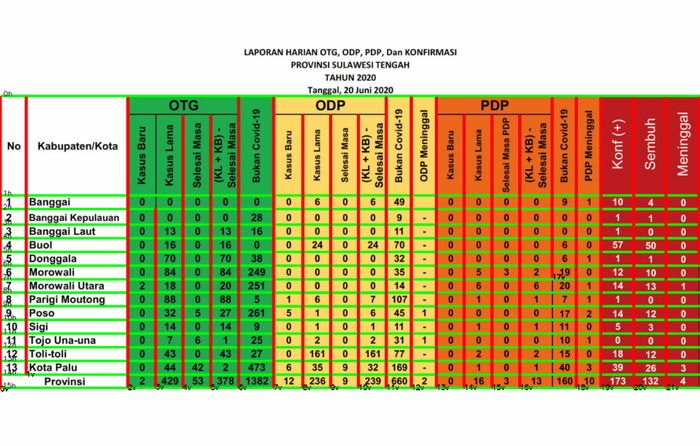
图5.霍夫线变换结果—带重叠滤波器
有了这个代码,就不会提取出重叠的行了。此外,我们还将在图像中写入水平和垂直线的索引,这将有利于ROI的选择。
ROI选择
首先,我们需要定义列数和行数。这里我们只对第二行第十四行以及所有列中的数据感兴趣。对于列,我们定义了一个名为关键字的列表,将其用于字典关键字。
## set keywords
keywords = ['no', 'kabupaten', 'kb_otg', 'kl_otg', 'sm_otg', 'ks_otg', 'not_cvd_otg',
'kb_odp', 'kl_odp', 'sm_odp', 'ks_odp', 'not_cvd_odp', 'death_odp',
'kb_pdp', 'kl_pdp', 'sm_pdp', 'ks_pdp', 'not_cvd_pdp', 'death_pdp',
'positif', 'sembuh', 'meninggal']
dict_kabupaten = {}
for keyword in keywords:
dict_kabupaten[keyword] = []
## set counter for image indexing
counter = 0
## set line index
first_line_index = 1
last_line_index = 14
然后,要选择ROI,我们定义了一个函数,该函数将图像(水平线和垂直线都作为输入)以及线索引作为边框。此函数返回裁剪的图像及其在图像全局坐标中的位置和大小
def get_cropped_image(image, x, y, w, h):
cropped_image = image[ y:y+h , x:x+w ]
return cropped_image
def get_ROI(image, horizontal, vertical, left_line_index, right_line_index, top_line_index, bottom_line_index, offset=4):
x1 = vertical[left_line_index][2] + offset
y1 = horizontal[top_line_index][3] + offset
x2 = vertical[right_line_index][2] - offset
y2 = horizontal[bottom_line_index][3] - offset
w = x2 - x1
h = y2 - y1
cropped_image = get_cropped_image(image, x1, y1, w, h)
return cropped_image, (x1, y1, w, h)
裁剪的图像将用于下一个任务,即文本提取。返回的第二个参数将用于绘制ROI的边界框
文字提取
现在,我们定义了ROI功能。我们可以继续提取结果。我们可以通过遍历单元格来读取列中的所有数据。列数由关键字的长度指定,而行数则由定义。
首先,让我们定义一个函数来绘制文本和周围的框,并定义另一个函数来提取文本。
import pytesseract
pytesseract.pytesseract.tesseract_cmd = r'C:\Program Files (x86)\Tesseract-OCR\tesseract.exe'
def draw_text(src, x, y, w, h, text):
cFrame = np.copy(src)
cv.rectangle(cFrame, (x, y), (x+w, y+h), (255, 0, 0), 2)
cv.putText(cFrame, "text: " + text, (50, 50), cv.FONT_HERSHEY_SIMPLEX, 2, (0, 0, 0), 5, cv.LINE_AA)
return cFrame
def detect(cropped_frame, is_number = False):
if (is_number):
text = pytesseract.image_to_string(cropped_frame,
config ='-c tessedit_char_whitelist=0123456789 --psm 10 --oem 2')
else:
text = pytesseract.image_to_string(cropped_frame, config='--psm 10')
return text
将图像转换为黑白以获得更好的效果,让我们开始迭代!
counter = 0
print("Start detecting text...")
(thresh, bw) = cv.threshold(gray, 100, 255, cv.THRESH_BINARY)
for i in range(first_line_index, last_line_index):
for j, keyword in enumerate(keywords):
counter += 1
left_line_index = j
right_line_index = j+1
top_line_index = i
bottom_line_index = i+1
cropped_image, (x,y,w,h) = get_ROI(bw, horizontal, vertical, left_line_index, right_line_index, top_line_index, bottom_line_index)
if (keywords[j]=='kabupaten'):
text = detect(cropped_image)
dict_kabupaten[keyword].append(text)
else:
text = detect(cropped_image, is_number=True)
dict_kabupaten[keyword].append(text)
image_with_text = draw_text(img, x, y, w, h, text)
问题解决
这是文本提取的结果!我们只选择了最后三列,因为它对某些文本给出了奇怪的结果,其余的很好,所以我不显示它。
 图6.检测到的文本—版本1
一些数字被检测为随机文本,即39个数据中的5个。这是由于最后三列与其余列不同。文本为白色时背景为黑色,会以某种方式影响文本提取的性能。
 图7.二进制图像
为了解决这个问题,让我们倒数最后三列。
def invert_area(image, x, y, w, h, display=False):
ones = np.copy(image)
ones = 1
image[ y:y+h , x:x+w ] = ones*255 - image[ y:y+h , x:x+w ]
if (display):
cv.imshow("inverted", image)
cv.waitKey(0)
cv.destroyAllWindows()
return image
left_line_index = 17
right_line_index = 20
top_line_index = 0
bottom_line_index = -1
cropped_image, (x, y, w, h) = get_ROI(img, horizontal, vertical, left_line_index, right_line_index, top_line_index, bottom_line_index)
gray = get_grayscale(img)
bw = get_binary(gray)
bw = invert_area(bw, x, y, w, h, display=True)
结果如下所示。
 图8.处理后的二进制图像
结果
反转图像后,重新执行步骤,这是最终结果!
算法成功检测到文本后,现在可以将其保存到Python对象(例如Dictionary或List)中。由于Tesseract训练数据中未包含某些地区名称(“ Kabupaten / Kota”中的名称),因此无法准确检测到。但是,由于可以精确检测到地区的索引,因此这不会成为问题。文本提取可能无法检测到其他字体的文本,具体取决于所使用的字体,如果出现误解,例如将“ 5”检测为“ 8”,则可以进行诸如腐蚀膨胀之类的图像处理。
源代码:https://github.com/fazlurnu/Text-Extraction-Table-Image